Pages

13 August 2015

I've Lost My Narbles Marbles


Today's Zen Doodle Fun is: I've Lost My Marbles


My marbles rolled away from me today and I've been hunting for them far and wide ever since.
Not much hope if I don't find them by bedtime as they have probably given up all thoughts of me and gone surfing in Hawaii.


Happy Doodling

12 August 2015

Zen Doodle Fun - Spewing Hairdryer


Today's Fun Doodle

The Spewing Hairdryer


I dropped the hairdryer
I heard it bang and fizz
Then it's innards came out of its spout and I departed for the dustpan and brush


Hahahahahahaha.

Happy Doodling

13 July 2015

Cro-Tangle Project

There is a special inspirational challenge on a group I'm in on Ravelry at the moment.
We have to create a crochet or knitted piece of work that uses Zentangles as its inspiration.

I have completed my Zen Art Doodle for this project, and now I am starting to create the crochet to match the tangles.

I will reveal the parts of the Art Doodle one bit at a time over the coming weeks or days as I complete the crochet bit that goes with the doodle.

This is the part of the art doodle that I chose to do first.


And here is my first part crocheted.


Now to experiment with more stitches for another part of it.

I'm having fun, and stretching my creativity all at the same time, lol.


11 July 2015

Collaboration Piece - Escher, Ria Hooghiemstra & ME

The Process of Producing a Piece of Art - How an Art Piece Develops
 Includes progress photos.

This piece is rather unusual. 
It started with Ria Hooghiemstra being inspired by some art of the famous M C Escher.
Then I was inspired by Ria's drawing and carried on with the design in my own way.

Here is Ria's 'Escher inspired' birds drawing in different colourways.


This is Ria's line drawing...


...and here is my line drawing, hand drawn straight from the screen.


Then comes my Zen Art Doodling additions.
The following progress photos show how the work changes at almost every step of the way.
When creating these Mandala style artworks, care must be taken to 'copy' the exact action (drawing) in each of the same segments around the piece. Complete all the same segments in the same way before moving on to the next area.


When all the doodling has been completed, it is time to create shadows to make the piece 'pop' in glorious 3-D.


I hope you enjoyed that little Mandala exercise.
Thank you Ria Hooghiemstra for the invitation to 'do something' with your drawing. It was fun.


16 April 2013

Zendoodles On A Leaf

This is not the first time I have Zendoodled a Leaf, but this time I thought I would show you the progress photos of how I did it.

I have a Puka tree in the native bush area on my farm. It produces leaves that are large, shiny and quite thick.
Some leaves can grow up to 50cm long and 20cm wide.


I used the nib of a dead Biro - (a ball-point pen that doesn't work any more).
This photo also gives you an idea of just how big this leaf is.


When 'drawing' on the leaf I use just enough pressure for the pen nib to break through the top surface of the leaf to create the design.


The drawing, or damaged surface of the leaf, will almost immediately turn brown, which will make the design show up more.


I drew a different doodle design in each segment between the larger veins.


I continued drawing different doodles and tangles all along one side of the leaf first.


Half the leaf done.


And then continued the doodling on the other half of the leaf.


Almost finished now.


Last one to do.


Finished.

And Signed.


The back of the leaf looks like this. Just a feint design showing through. 


And here are some detail photos that show up very well in the sunlight.
Remember, 
this is not the ink making these drawings, it is the damaged surface of the leaf 
from the dead pen nib, or any other such sharp object.


The beauty of this project is that it will keep changing.
The leaf will slowly turn completely brown over the coming weeks, but the design (doodle drawings) will always stay just that bit darker.
I will take photos of it as it changes colour to show you how it alters over time.

This project will continue evolving without me doing any more to it.

Nature will take its own course.

If you try doodling (or tangling) on anything other than paper, please leave a comment below. 
I would love to know what you Doodle on.
Especially if you try Doodling On A Leaf.

Happy Doodling


17 March 2013

Bloglovin Blog Claim

Follow my blog with Bloglovin


If you are using Google Reader to follow your favourite blogs, you will know that it is closing soon.
I am giving BlogLovin a try to take it's place.
I hope you will continue to follow my blog, no matter what Reader you choose.

Hugs to all.

20 February 2013

Word Doodles Playtime

..SOME WORD DOODLING FUN..


Music To My Ears

The Vortex of Love 

Love Conquers All 


This page, and contents, are property and copyright of:
© Cyra Lewis 2013

If you are not seeing this page on the Zen Art Doodles website:
please email me to let me know my work has been used without my permission: Cy

18 October 2012

Zendala Mandala - Tutorial

Two Easy Ways to Create a Doodle Mandala

an Art Tutorial by Cyra Lewis


I will be posting a YouTube video for another Mandala technique soon.

Don't forget to subscribe to my blog if you want notice of when it has gone 'live'.


Zendala One


Start with two pieces of paper in different colours.


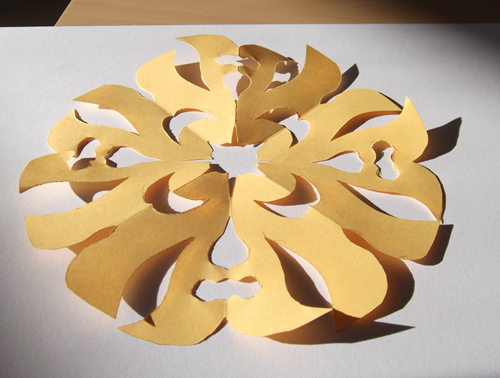
Cut a circle from one colour,


Fold it in half.


Then into quarters.


And finally fold it into eighths.


Use scissors to cut shapes from the folded sides.

(just like making paper snowflakes with the kids at Christmas)


Carefully unfold your paper Mandala.


Using a soft pencil (3B) draw around the Mandala template onto your other piece of paper.

You can use tiny bits of Blue Tack to hold it in place while you draw around it.


Next you draw over the pencil marks with your Pigma pen (or whatever pen you prefer to use)

I got a nice bold line with my 0.5 Pigma.

Now would be a good time to erase any pencil lines still showing.


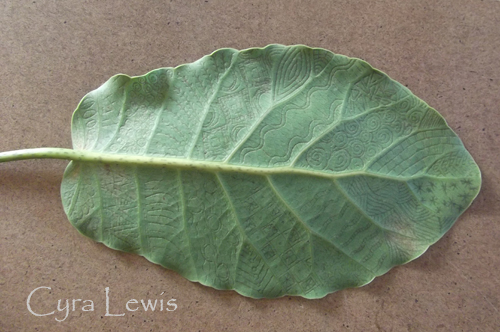
Then you can have some fun filling in parts of the Mandala with your favourite Doodles and Tangles.

You can join lines, add more lines and shapes, and tangle whatever bits you like.

Just make sure that you repeat the same action on the mirror image and repeats around the Mandala.


Here is my finished design for this demonstration technique.


Zendala Two


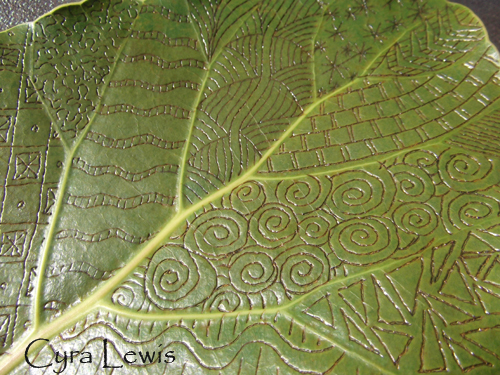
Using the Mandala template that you made in the first technique, use a glue-stick to glue the paper template to another piece of paper of a contrasting colour.

Make sure you get glue-stick on all the edges and points of the cut-outs.


Draw around all the edges with your Pigma pen and then start your doodling on the shapes that appear on the two different coloured parts.


Here is my final Doodling on this technique.

It's a great way to add some colour to your Doodles.


Please let me know in the comments section below if you enjoyed this tutorial and would like some more.

Also, 

if you make use of my tutorial, please leave a link to share your 

Mandala - Zentangle - Zendala 

creations.


All photos and content are copyright of Cyra Lewis 2012. All Rights Reserved.

Please respect the copyright laws.


This website is Zen Art Doodles

Happy Zendoodling