This is not the first time I have Zendoodled a Leaf, but this time I thought I would show you the progress photos of how I did it.
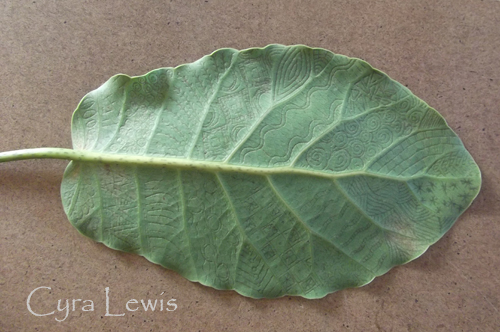
I have a Puka tree in the native bush area on my farm. It produces leaves that are large, shiny and quite thick.
Some leaves can grow up to 50cm long and 20cm wide.

I used the nib of a dead Biro - (a ball-point pen that doesn't work any more).
This photo also gives you an idea of just how big this leaf is.

When 'drawing' on the leaf I use just enough pressure for the pen nib to break through the top surface of the leaf to create the design.

The drawing, or damaged surface of the leaf, will almost immediately turn brown, which will make the design show up more.

I drew a different doodle design in each segment between the larger veins.

I continued drawing different doodles and tangles all along one side of the leaf first.

Half the leaf done.

And then continued the doodling on the other half of the leaf.


Almost finished now.

Last one to do.

Finished.
And Signed.

The back of the leaf looks like this. Just a feint design showing through.
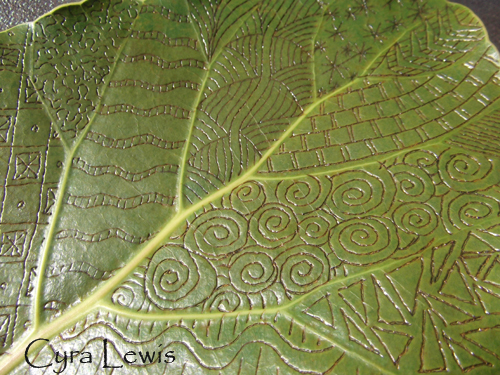
And here are some detail photos that show up very well in the sunlight.
Remember,
this is not the ink making these drawings, it is the damaged surface of the leaf
from the dead pen nib, or any other such sharp object.


The beauty of this project is that it will keep changing.
The leaf will slowly turn completely brown over the coming weeks, but the design (doodle drawings) will always stay just that bit darker.
I will take photos of it as it changes colour to show you how it alters over time.
This project will continue evolving without me doing any more to it.
Nature will take its own course.
If you try doodling (or tangling) on anything other than paper, please leave a comment below.
I would love to know what you Doodle on.
Especially if you try Doodling On A Leaf.
Happy Doodling
